How To Clean Front Load Washer Easy
Raise your hand if you knew your front load washing machine had a filter that needs regular cleaning. Surprised? You’re not alone. In the hustle and bustle of modern life, it’s easy to overlook the maintenance of our household appliances. Yet, keeping your washing machine in top condition is crucial for ensuring your clothes come out clean and fresh every time. Washing machines have evolved significantly since the days our grandparents taught us how to use them, and so has the care they require. Whether you’re encountering a musty smell from your machine or simply aiming for peak performance, it’s time to dive into the essential maintenance tasks to clean front load washer.
Prefer a visual guide? We’ve got you covered! Before you read on, check out our step-by-step YouTube video below. It’s perfect for those who prefer watching over reading. If you’re all about the details or enjoy a good read, continue on to discover the five key areas of your washer that demand immediate attention.
Related Post: How To Clean Your Dryer Vent Line
Watch Step-By-Step How To Clean Front Load Washer On YouTube
Washer Tub (Bi-Monthly Cleaning Recommended)
Maintaining a clean washer tub is vital for preventing the buildup of detergents and softeners that can lead to unsightly mildew or persistent musty odors. Here’s how to ensure your tub remains in pristine condition:
- Step 1: Choose a cleaner. While commercial products like Affresh or Active are formulated specifically for washing machines, you can opt for a more natural approach by using white distilled vinegar. This eco-friendly alternative is not only effective at breaking down residue but also safe for the environment.
- Step 2: Run the cleaning cycle. Place your chosen cleaner directly in the drum of the machine. Select the “tub clean” cycle if your washer has this setting. Alternatively, use the longest wash cycle available to ensure a thorough clean. This step is crucial for reaching and dissolving all residue within the tub.
- Step 3: Complete a rinse cycle. Following the cleaning cycle, run a rinse-only cycle to wash away any remaining cleaning solution and loosened debris. This ensures that no cleaner remains in the tub that could potentially transfer to your next load of laundry.
- Step 4: No laundry. It’s important to perform this maintenance without any clothing in the machine. This allows the cleaning solution to circulate freely, reaching all areas of the tub for an effective clean.
Regular bi-monthly cleaning of your washer tub will not only keep it smelling fresh but also enhance the efficiency and longevity of your machine. By removing residue that can clog components, you’re ensuring your washer operates at its best, providing clean and fresh laundry with every cycle.
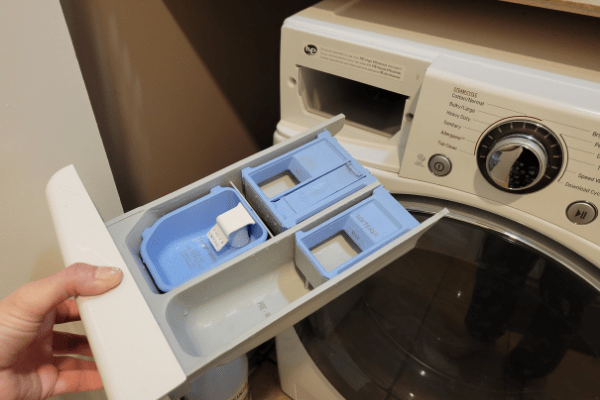
Detergent Dispenser (Monthly Cleaning Recommended)
Over time, residue from detergent and fabric softener, alongside mold, mildew, and scale, can accumulate in your detergent dispenser, leading to inefficiency and unpleasant odors. Here’s a step-by-step guide to keeping it clean:
- Step 1: Gently pull out the detergent dispenser drawer. Check if your model features a release button or mechanism to facilitate this. If so, press it to remove the drawer smoothly.
- Step 2: Take the drawer and any removable inserts to the sink. Rinse them under warm water, using a soft brush or cloth to scrub away any buildup of detergent, fabric softener, mold, or mildew.
- Step 3: Create a cleaning solution by mixing equal parts distilled white vinegar and warm water in a spray bottle. If you’re sensitive to the smell of vinegar, a mild detergent solution can be an effective alternative. Spray the inside of the detergent dispenser compartment thoroughly.
- Step 4: With a soft brush or cloth, gently scrub the compartment to remove any lingering scale, mold, or detergent residue. This step is crucial for preventing blockages and ensuring the dispenser operates smoothly.
- Step 5: After cleaning, rinse the drawer and compartment with water. Make sure to dry them before reassembly. Replace the detergent dispenser drawer and run a rinse cycle to flush out any cleaning solution remnants, ensuring your next load of laundry is residue-free.
By incorporating these simple steps into your monthly cleaning routine, you can significantly reduce the risk of detergent buildup and keep your washing machine smelling fresh. Remember to consult your machine’s user manual for any specific maintenance advice or instructions related to the detergent dispenser.
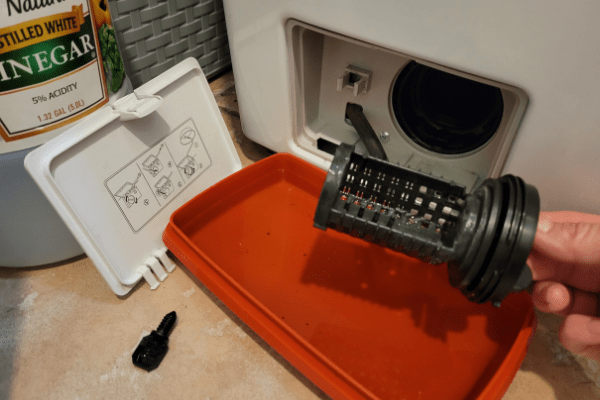
Drain Pump Filter (Monthly Cleaning Recommended)
A clean drain pump filter is essential for preventing your machine from failing to drain properly. A clogged filter not only impedes efficiency but can also lead to longer cycle times and even damage to your machine. Follow these steps to ensure your filter remains clear:
- Step 1: Locate and access the filter. Many models feature a small panel on the front of the machine that conceals the drain pump filter. Open this panel by following the instructions in your washer’s user manual, as mechanisms can vary.
- Step 2: Prepare for water drainage. Place a shallow bowl or a towel on the floor in front of your washer to catch any water that may spill when you remove the filter.
- Step 3: Drain the water. Gently pull out the drain hose if accessible, directing any residual water into the bowl or onto the towel. This step helps manage water spillage.
- Step 4: Remove and clean the filter. Turn the pump filter counterclockwise to unscrew and remove it. Check the filter and the surrounding area for debris and small items, such as coins or socks, that can easily become trapped. Rinse the filter under running water, using a soft brush to remove any lint or buildup.
- Step 5: Clean the filter housing. Spray a solution of equal parts distilled white vinegar and warm water into the housing. Use a soft cloth or brush to gently scrub the area, ensuring it’s free from debris and soap scum.
- Step 6: Reassemble and test. After cleaning, reinsert the filter by screwing it back in clockwise. Ensure it’s securely in place before closing the panel. Run a short rinse cycle to check that the machine drains properly without leaks.
Cleaning your drain pump filter monthly can significantly improve your washing machine’s performance and prevent drainage issues. It’s a simple yet crucial maintenance task that can save you from future headaches and potential repair costs.
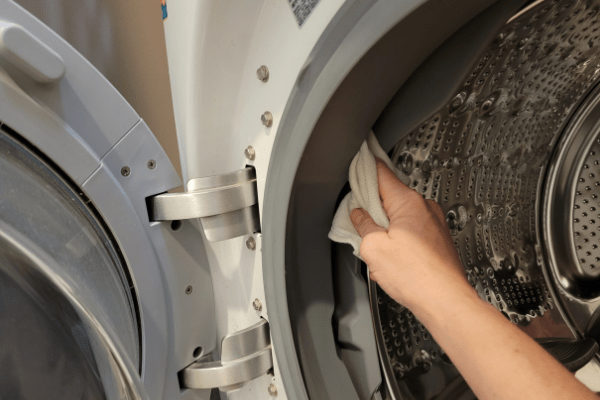
Door Seal (Monthly Cleaning Recommended)
The rubber door seal on your front load washer is a critical area that often harbors moisture and residue, leading to the growth of mold and mildew. Regular cleaning not only prevents unpleasant odors but also maintains the integrity of the seal. Here’s how to effectively clean this component:
- Step 1: Wear protective gear. Before starting, put on rubber gloves and safety glasses to protect your skin and eyes from any cleaning agents, especially if you’re using bleach.
- Step 2: Prepare the cleaning solution. Mix ¾ cup of liquid chlorine bleach with 1 gallon of warm water. For those preferring not to use bleach, a mixture of white vinegar and water can be an effective alternative for removing mold and mildew without harsh chemicals.
- Step 3: Clean the seal. Dip a soft cloth or sponge in the cleaning solution and carefully wipe around the entire rubber door seal. Pay special attention to any folds or crevices where moisture can collect and mold can grow.
- Step 4: Wipe dry and air out. After thoroughly cleaning the seal, use a dry rag to remove any excess moisture. Leave the washing machine door open for several hours to air dry completely, ensuring no dampness remains that could encourage mold growth.
- Step 5: Regular checks for damage. While cleaning, inspect the seal for any signs of wear or damage. Promptly replacing a damaged seal is crucial to prevent water leaks and protect your laundry room from potential water damage.
By incorporating the door seal into your monthly cleaning routine, you’ll significantly reduce the risk of mold and mildew buildup, keeping your washer smelling fresh and operating efficiently. This simple maintenance task is key to extending the lifespan of your appliance and ensuring a clean, healthy environment for your laundry.
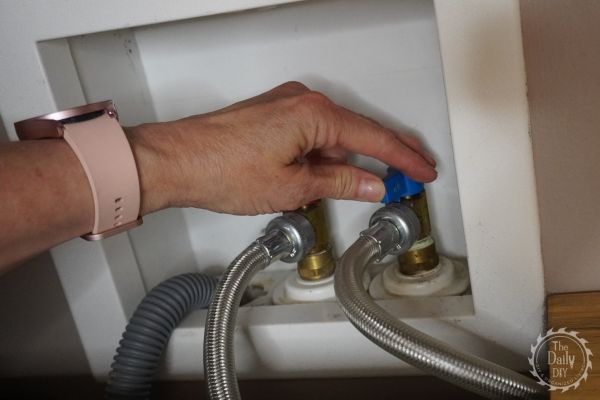
Inlet Filters (Clean As Needed)
Inlet filters in your washing machine play a pivotal role in ensuring a clean water supply to your machine, which is crucial for optimal performance. These filters can become clogged with sediment and debris over time, especially in areas with hard water. Regular cleaning can prevent this buildup and ensure your machine operates efficiently. Here’s how to keep them in top condition:
- Step 1: Turn off the water supply. Before you start, make sure to turn off the water faucets to prevent any accidental water flow. This is a crucial safety step to avoid water spillage.
- Step 2: Remove the water hoses. Carefully disconnect the water inlet hoses from the back of your washing machine. This might require a pair of pliers but proceed gently to avoid damaging the connections.
- Step 3: Extract the filters. With the hoses removed, locate the inlet filters inside the water inlets on your machine. They can typically be easily pulled out or unscrewed using your fingers or a gentle tool.
- Step 4: Clean the filters. Rinse the filters under running water to remove any loose sediment. For more thorough cleaning, soak them in a solution of distilled white
- for at least 30 minutes. This will help dissolve any mineral deposits. A soft brush, such as a toothbrush, can be used to gently scrub the filters and remove stubborn buildup.
- Step 5: Reinstall everything. After cleaning, insert the filters back into the inlets and reattach the hoses securely. Turn the water faucets back on and check for any leaks to ensure everything is connected properly.
Cleaning the inlet filters is an often-overlooked but essential maintenance task. Depending on your water quality, you might need to do this more frequently if you have hard water or less often if your water is soft. Regular maintenance helps prevent issues related to poor water flow and prolongs the life of your machine.
By following these steps, you ensure that your washing machine receives a clean, unobstructed water supply, keeping it running efficiently and your clothes coming out clean and fresh.
Shop For Cleaning Supplies
Conclusion
In conclusion, taking the time to clean your front load washer is not just about maintaining its appearance but ensuring its efficiency and longevity. The cleaning tips outlined above are designed to guide you through the essential aspects of washing machine care, emphasizing the importance of regular maintenance. By incorporating these practices into your cleaning routine, you can prevent the common issues that detract from your washer’s performance and lifespan.
Front load washer maintenance is a critical component of household appliance care. Regularly cleaning the detergent dispenser, tub, drain pump filter, door seal, and inlet filters will keep your machine running smoothly and your laundry smelling fresh. Not only does this approach save you time and money on potential repairs, but it also contributes to a more sustainable lifestyle by extending the life of your appliance.
Remember, a clean front load washer is the key to efficient laundry days. By following these straightforward washing machine care tips, you can enjoy a cleaner, healthier home environment. So, take this opportunity to check your washer and make front load washer maintenance a priority in your home care routine.