How To Fill Raised Garden Beds Cheap
Are you dreaming of a vegetable garden but worried about the cost and complexity? Fear not! Creating a beautiful and productive raised garden bed doesn’t have to break the bank. In this step-by-step guide, we’ll show you how to fill cheap raised garden beds using materials you might already have lying around. Get ready to transform your outdoor space into a thriving garden with minimal effort and expense.
Why Choose Raised Garden Beds
According to the National Garden Bureau, raised garden beds offer many advantages over traditional in-ground gardening. First, they provide better drainage, which is crucial for healthy plant growth. By elevating the soil, excess water can escape, preventing waterlogging and root rot. Secondly, raised beds allow for more control over the soil quality. You can tailor the soil mixture to suit the specific needs of your plants, ensuring they get the right balance of nutrients. Additionally, raised beds can help reduce back strain, as they require less bending and stooping when planting, weeding, and harvesting. They also help keep pests like snails and slugs at bay and can even deter some larger critters from munching on your precious plants.
The Importance of Layering In Raised Garden Beds
Filling your raised garden bed with soil alone might seem like the simplest approach, but it’s not always the best. Soil can be expensive, especially if you’re filling a large bed. And using only soil can lead to compaction over time, making it harder for roots to grow. By layering different materials, you not only save money but also create a more hospitable environment for your plants. The bottom layer of logs or firewood acts as a natural sponge, holding moisture and slowly releasing it as the plants need it. The middle layer of leaves and organic matter provides essential nutrients as it decomposes, and the top layer of soil and peat moss offers the perfect blend of drainage and water retention. This layered approach mimics the natural soil structure found in forests, promoting healthier plant growth and a more vibrant garden.
Watch Our Quick Video Guide!
If you’re short on time or prefer a visual guide, check out our quick 90 second video on YouTube! We cover all the essential steps for creating and filling a cheap raised garden bed, perfect for your DIY gardening needs. Click here to watch and get started on your gardening journey with ease.
How To Fill a Raised Garden Bed Cheap
Now that you know the benefits of raised garden beds and the importance of layering, let’s dive into the steps to create and fill your own budget-friendly vegetable, or fruit, garden.
Step 1: Choose Your Location
First things first, select a spot in your yard that receives ample sunlight and has good drainage. Ensure the area is level to prevent water from pooling in one section of your garden bed.
Step 2: Assemble Your Metal Raised Garden Bed
Metal raised garden beds are a great option and can be very cheap. Especially if your looking for durability and ease of assembly. They often come in kit form, so follow the manufacturer’s instructions to put together your bed. If you’re wondering how to build a raised garden bed cheap, metal beds are often more affordable than wood in the long run due to their longevity.
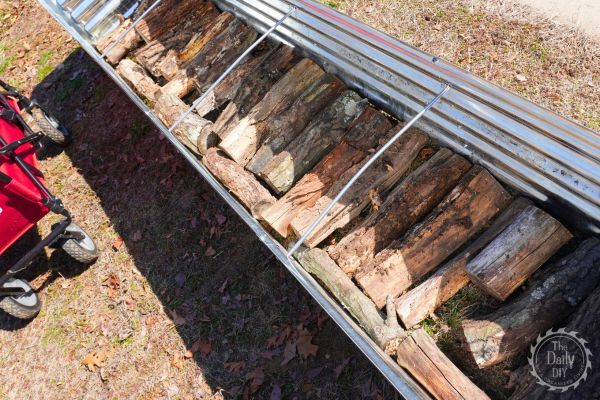
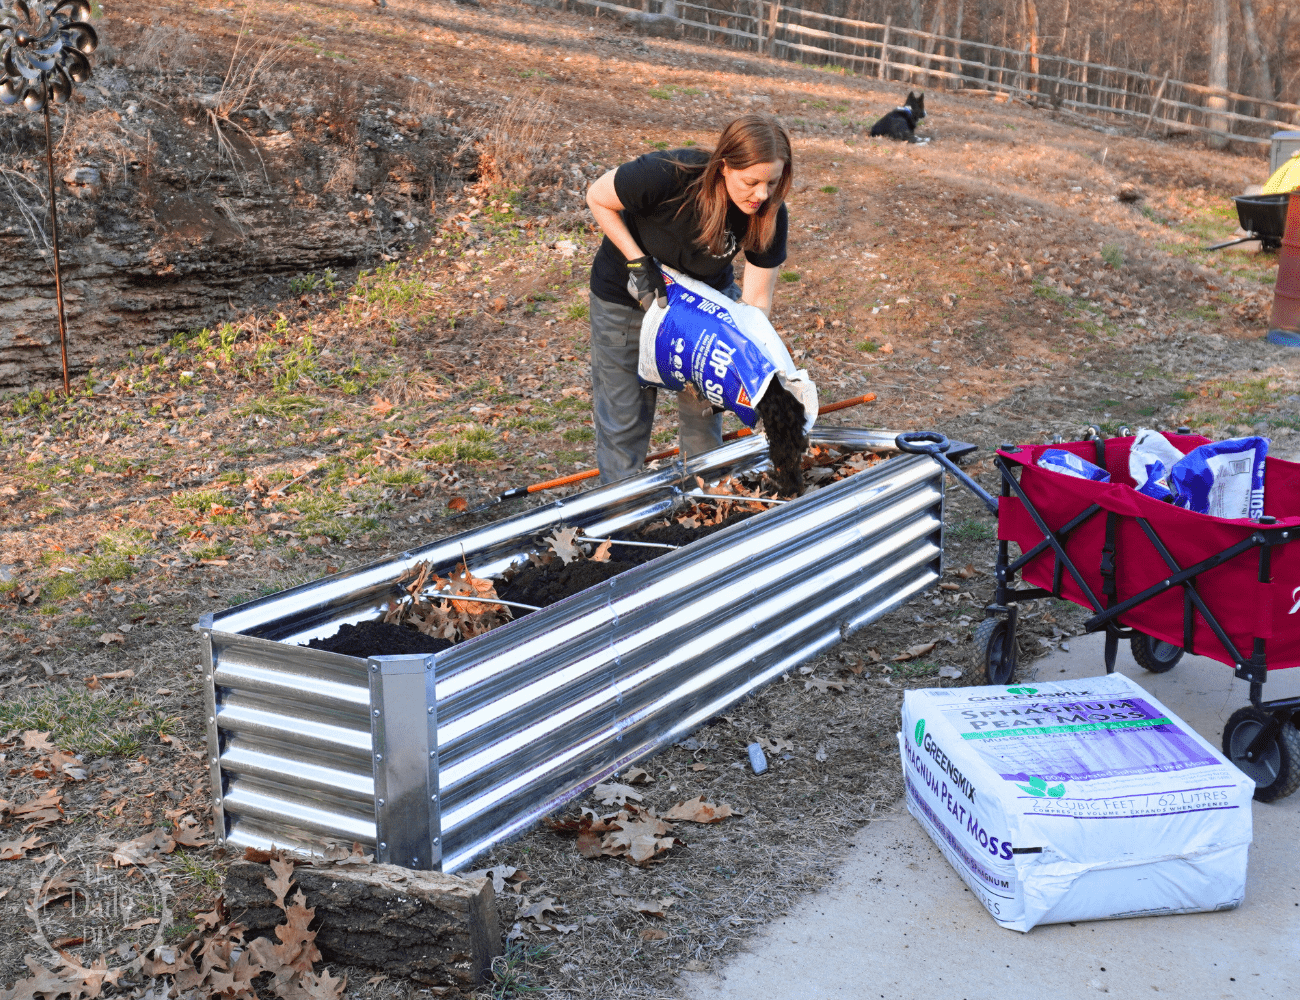
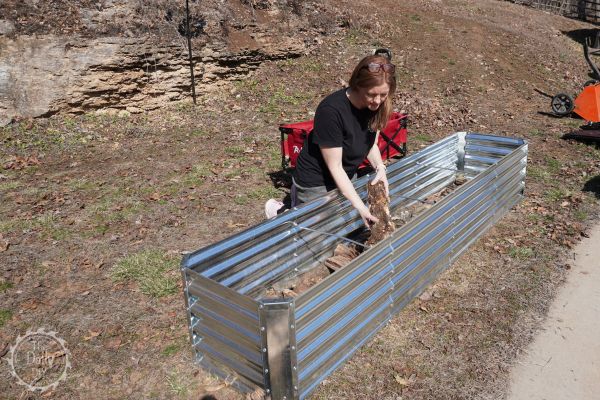
Step 3: Line the Bottom with Logs or Firewood
Before adding any soil, line the bottom of your garden bed with logs or firewood. This layer serves multiple purposes: it helps with drainage, adds organic matter as it decomposes, and reduces the amount of soil you’ll need to fill the bed.
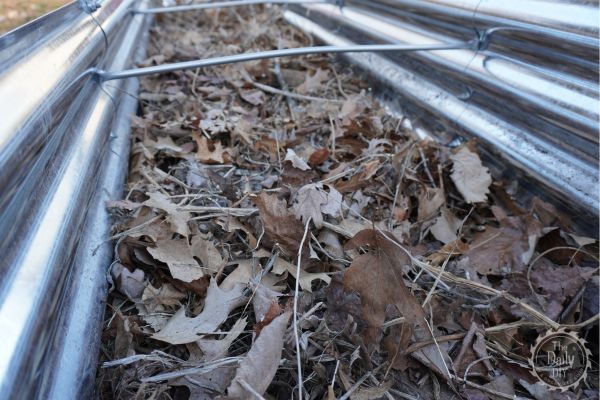
Step 4: Add Leaves, Sticks, and Organic Matter
On top of the logs, add a layer of leaves, sticks, and other organic matter. This can include grass clippings, straw, or even shredded newspaper. This layer will further improve drainage and, as it breaks down, will provide essential nutrients to your plants.

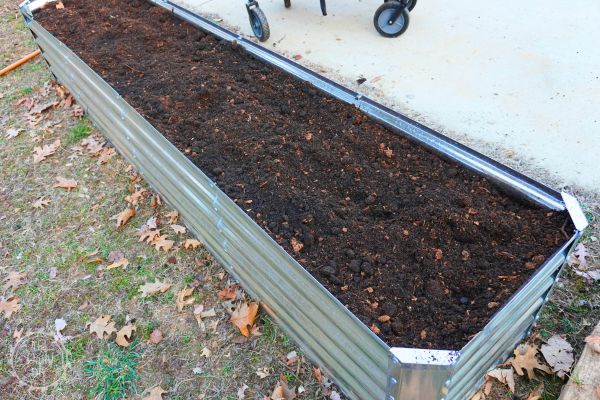
Step 5: Top with a Mixture of Soil and Peat Moss
Now, it’s time to add your growing medium. Mix together garden soil and peat moss in a 50/50 ratio. Peat moss helps keep moisture in and provides a light, airy structure for roots to grow. Fill your raised bed with this mixture, leaving a few inches of space from the top for easy planting.
Step 6: Plant Your Seeds or Seedlings
With your bed filled, you’re ready to plant! Whether you’re starting from seeds or transplanting seedlings, make sure to space them according to their specific needs. Water your new plants good and keep an eye on their moisture levels, especially in the first few weeks.
Step 7: Maintain and Enjoy
Congratulations! You’ve created a cheap raised garden bed that’s ready to burst with life. Check on your plants often, water as needed, and watch as your garden transforms into a vibrant oasis.
Finding the Perfect Raised Garden Bed
If you’re looking for a great deal on a raised garden bed, Amazon has a wide selection to choose from. One option that stands out for its durability and affordability is the metal raised garden bed. These beds are easy to assemble, resistant to weather and pests, and can last for many years with minimal maintenance. To help you get started, we’ve curated a Pinterest pin featuring a top-rated metal raised garden bed Amazon. Check it out on Pinterest, or we have it added to our Garden & Outdoor Section on our Product Recommendations page.
Shop Here
Conclusion
Building and filling a raised garden bed doesn’t have to be an expensive or daunting task. By following these simple steps, you can create a thriving garden that’s both budget-friendly and easy to maintain. So roll up your sleeves, get your hands dirty, and enjoy the fruits (or vegetables) of your labor!
Other Popular Outdoor & Garden Posts: